
Create a Quick Video
Quick Video is the guided way to make a property video. You describe the property, Roxybit writes and structures the script, and you customise every scene before generating. Two screens — Property Details, then Review Draft.
Before you start
Section titled “Before you start”- A property address and a few photos (both required to generate the script).
- Enough credits / an active plan to generate — the cost is always shown before you commit. See Video pricing.
Step 1 — Property Details
Section titled “Step 1 — Property Details”Tell Roxybit about the property. Everything here feeds the script it writes.
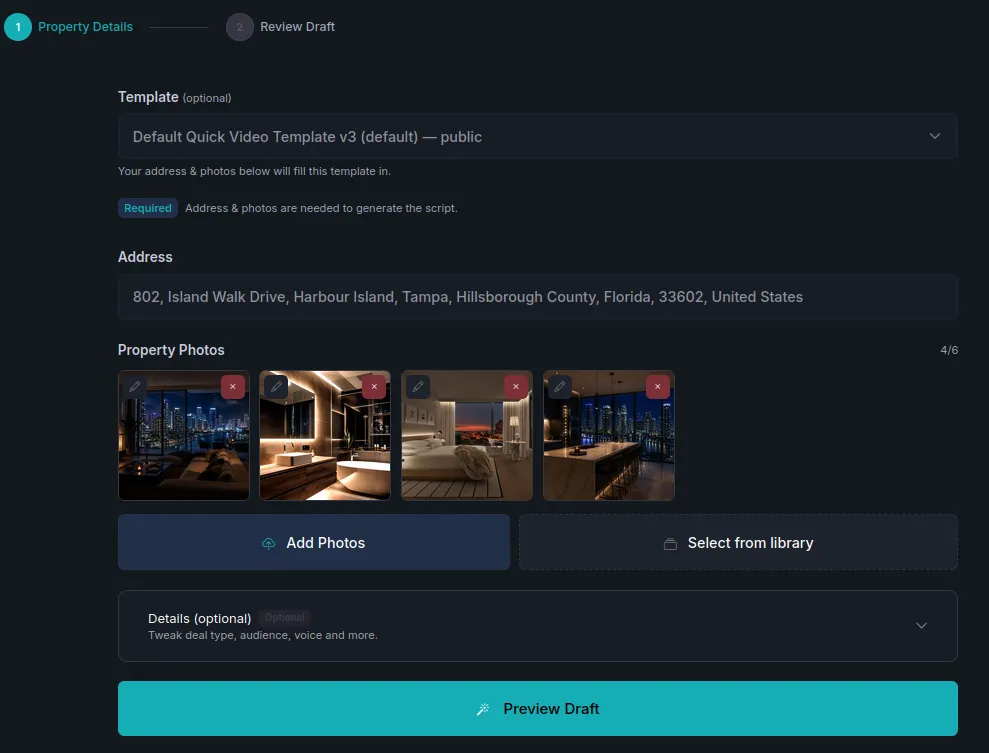
- Template (optional) — start from a ready-made structure; your address and photos fill it in. Leave the default if unsure.
- Address — the full property address, used for on-screen location maps and neighbourhood context.
- Property Photos — the images your scenes are built from. The counter (e.g. 4/6) shows how many you’ve added; the pencil edits a photo and ✕ removes it.
- Add Photos — upload from your device.
- Select from library — reuse images from your media library.
- Auto-detect rooms · $0.10 — Roxybit looks at your photos and labels each one (kitchen, bedroom, pool, front exterior, floor plan…), and notes what’s in it so the narration can mention real features. The label shows on each photo; tap it to change it. Photos it can’t read with confidence say Choose room — pick it yourself. Photos already detected are never charged again.
- Details (optional) — fine-tune deal type, audience, voice and more.
Press Preview Draft to generate the first script and move to screen 2.
Step 2 — Review Draft
Section titled “Step 2 — Review Draft”The script is split into scenes shown in the strip along the bottom. Select any scene to edit it. Every scene card shows its type, position (e.g. 5 / 5), duration, and a 🗑 delete button.
Avatar scene
Section titled “Avatar scene”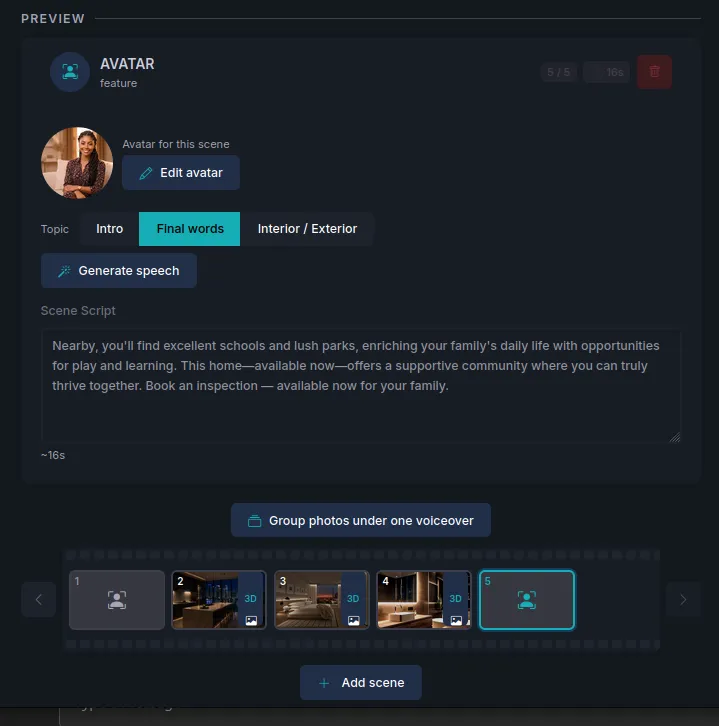
- Edit avatar — swap the on-screen presenter or adjust its look.
- Topic — Intro, Final words, or Interior / Exterior — guides what Roxybit writes.
- Generate speech — writes the narration for that topic into the Scene Script.
- Scene Script — the narration; the duration estimate (e.g. ~16s) updates as you type.
Photo scene
Section titled “Photo scene”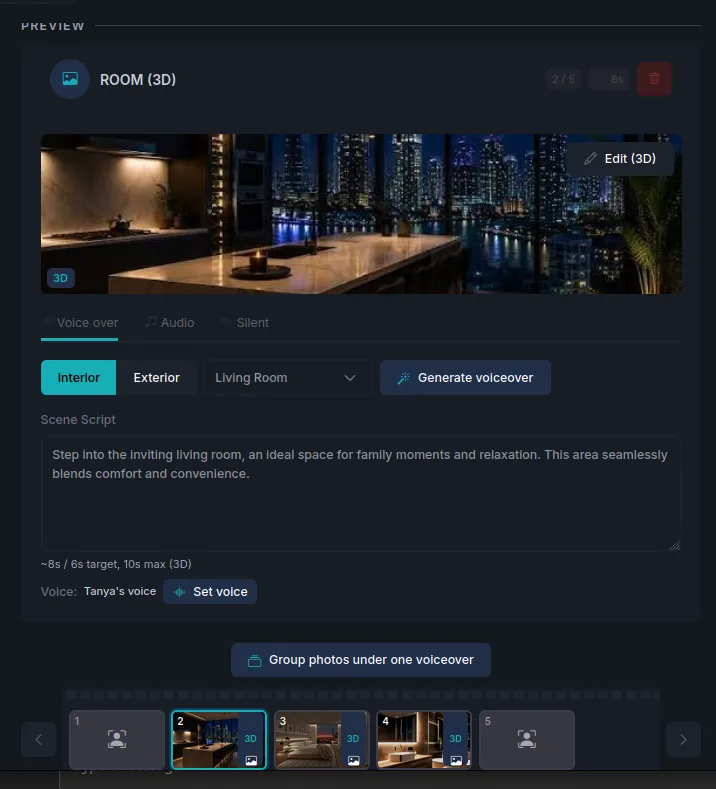
- Edit (3D) — adjust the photo or toggle the 3D parallax effect (the 3D badge shows it’s on).
- Voice over / Audio / Silent — how the scene sounds.
- Interior / Exterior / Other + room type — mark the shot so the narration fits the space. Auto-detect rooms (here or on screen 1) fills these in for every photo you haven’t set yourself; you can change any of them. A photo it couldn’t read says Couldn’t detect — choose manually.
- Generate voiceover — writes narration for this scene.
- Voice → Set voice — the voice that reads the script. See Voices.
Final settings
Section titled “Final settings”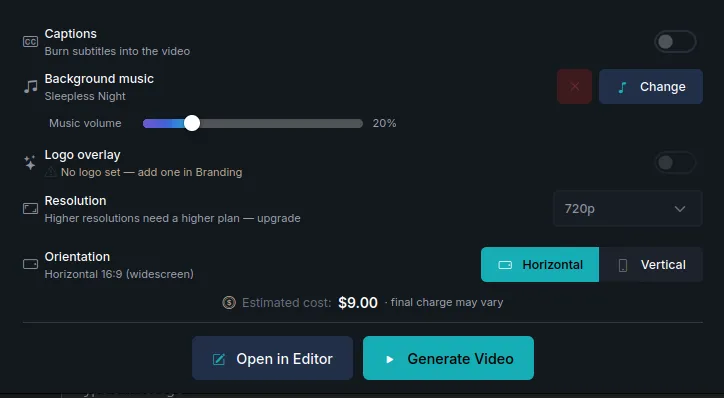
These apply to the whole video:
| Setting | What it does |
|---|---|
| Captions | Burn subtitles into the video. |
| Background music | Choose a track; adjust volume, Change, or remove with ✕. |
| Logo overlay | Show your brand logo (add one under Branding). |
| Resolution | Output quality (e.g. 720p). Higher needs a higher plan and takes longer. |
| Orientation | Horizontal (16:9) for listings/YouTube, Vertical (9:16) for Reels/TikTok/Stories. |
The Estimated cost is shown before you commit.
Generate & find your video
Section titled “Generate & find your video”Press Generate Video. Rendering runs in the background — you don’t need to wait on the page.
Your finished video appears under Videos to preview or download. Prefer finer control first? Use Open in Editor.
Next steps
Section titled “Next steps”- Processing time — what to expect after you generate.
- Video editor — fine-tune scenes, timing and transitions.
- Video pricing — how cost is calculated.